Guide
The Schedun manual
Everything from installation to every feature: search, schedule planning, calendar, course exchange and settings.
Getting started
Starting up for the first time
Installation
The installer copies the application across and creates the folder structure alongside it. The application checks for updates on its own and installs the new version itself once offered.
License or demo
On first launch a license key can be entered, or the free version can be used via the "Continue in Demo" button. Activation binds the key to that machine, so it is best done on the computer actually in use.
Loading the data
The Excel files exported from Neptun can be imported from Settings, or copied by hand into the folder of the semester in use, after which every feature is available.
What needs exporting from Neptun?
Schedun is not wired into the Neptun system: search and schedule planning work solely from files exported by the user. There are two kinds of export, and which one is needed depends on the feature.
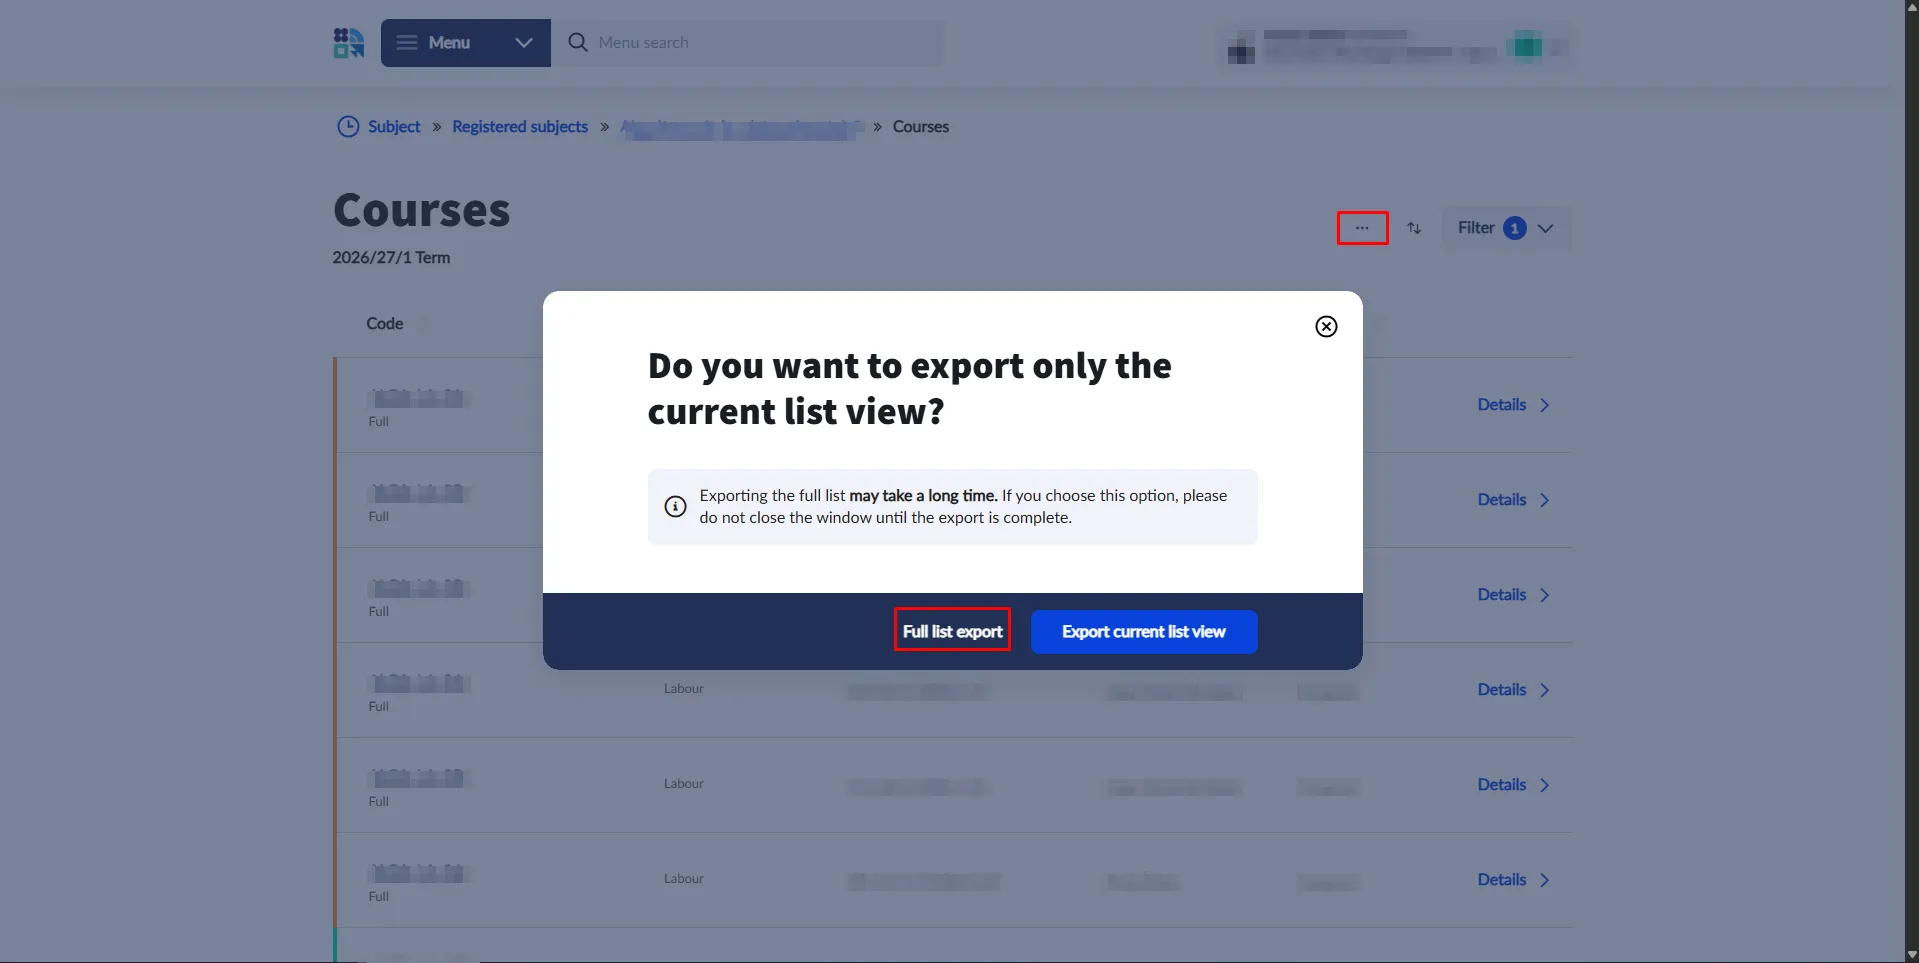
- Course list — on the subject's data page, under Courses, via the three dots and Export full list. Schedule planning needs a single such file per subject, and the same file also serves the search.
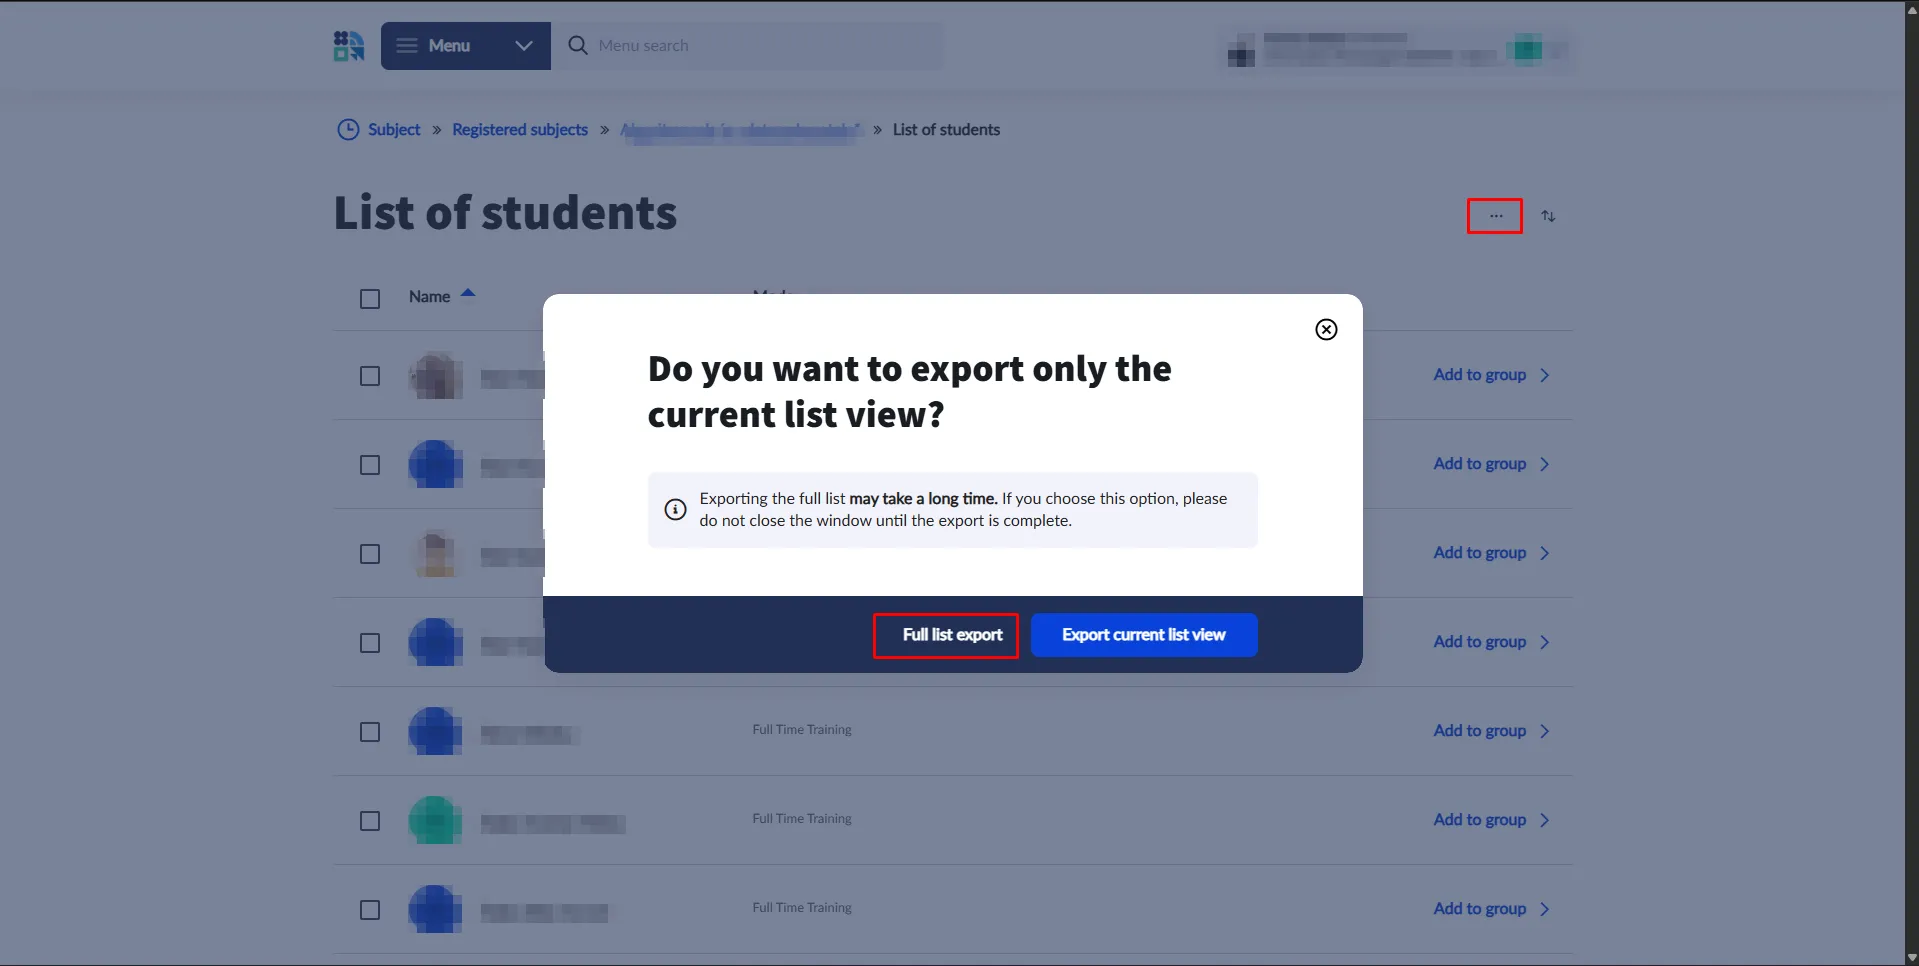
- Student list — after opening the course (visible only for registered courses), on the Student list tab, exported the same way. This is what student search needs.
In both cases the … button in the top right starts the export, and in the dialog that appears the Full list export option is the one to pick — exporting the current list view only saves the rows visible at that moment.
Importing from Settings
The simplest way to bring files in is the Import… button beside a semester in theSemesters section of Settings, which accepts several files at once. The program recognises files by their content, whatever they are called, so names such as "export (3).xlsx" given by Neptun cause no trouble.
- Student lists and calendar files (.ics) go to their place on their own.
- For course lists, Where do the course lists go? offers Planner,Search or Both.
- If a course list's file name does not reveal its subject, the program asks for the subject name.
- Once the import finishes, the search databases refresh automatically; a progress indicator shows the process.
Semesters
Each semester's exports go into a separate folder, so there is no need to delete the previous files when a new semester begins, and earlier semesters can be switched back to at any time. The semester in use is selected in the Semester picker in the left sidebar, or with the Use button in theSemesters section of Settings.
A new semester is created with + New semester; the program also suggests a name based on the current date, for example 2026/27/1. Semesters can be renamed with Rename, while Delete removes all of a semester's files and search databases. The semester cannot be switched while generation is running.
The folder structure
Files can also be copied by hand into the Exports folder next to the application. Its layout is:
- Semesters / <semester> — one folder per semester, for example2026-27-1 for the first semester of the 2026/27 academic year and2026-27-2for the second. Within it:
- Schedule — the course lists used for schedule planning, one file per subject, named after the subject.
- Search / Students — the student lists per course, used for student search, named after the course.
- Search / Subjects — the course lists used by the search. Teacher search works from these, and they identify which subject and time slot a found student's course belongs to. Without them the student is still displayed, but with course information only.
- Calendar — where the application stores downloaded and imported calendars; nothing needs copying here by hand.
After copying files by hand, Refresh Database reads them in. The Open Folderbutton on the Search tab opens the folder of the semester in use directly.
When updating from an earlier version, nothing needs doing: on first launch the application itself moves the contents of the old Exports / Schedule and Exports / Search into a semester folder, and the files of the retired Search / Teachers folder intoSearch / Subjects.
How the window is laid out
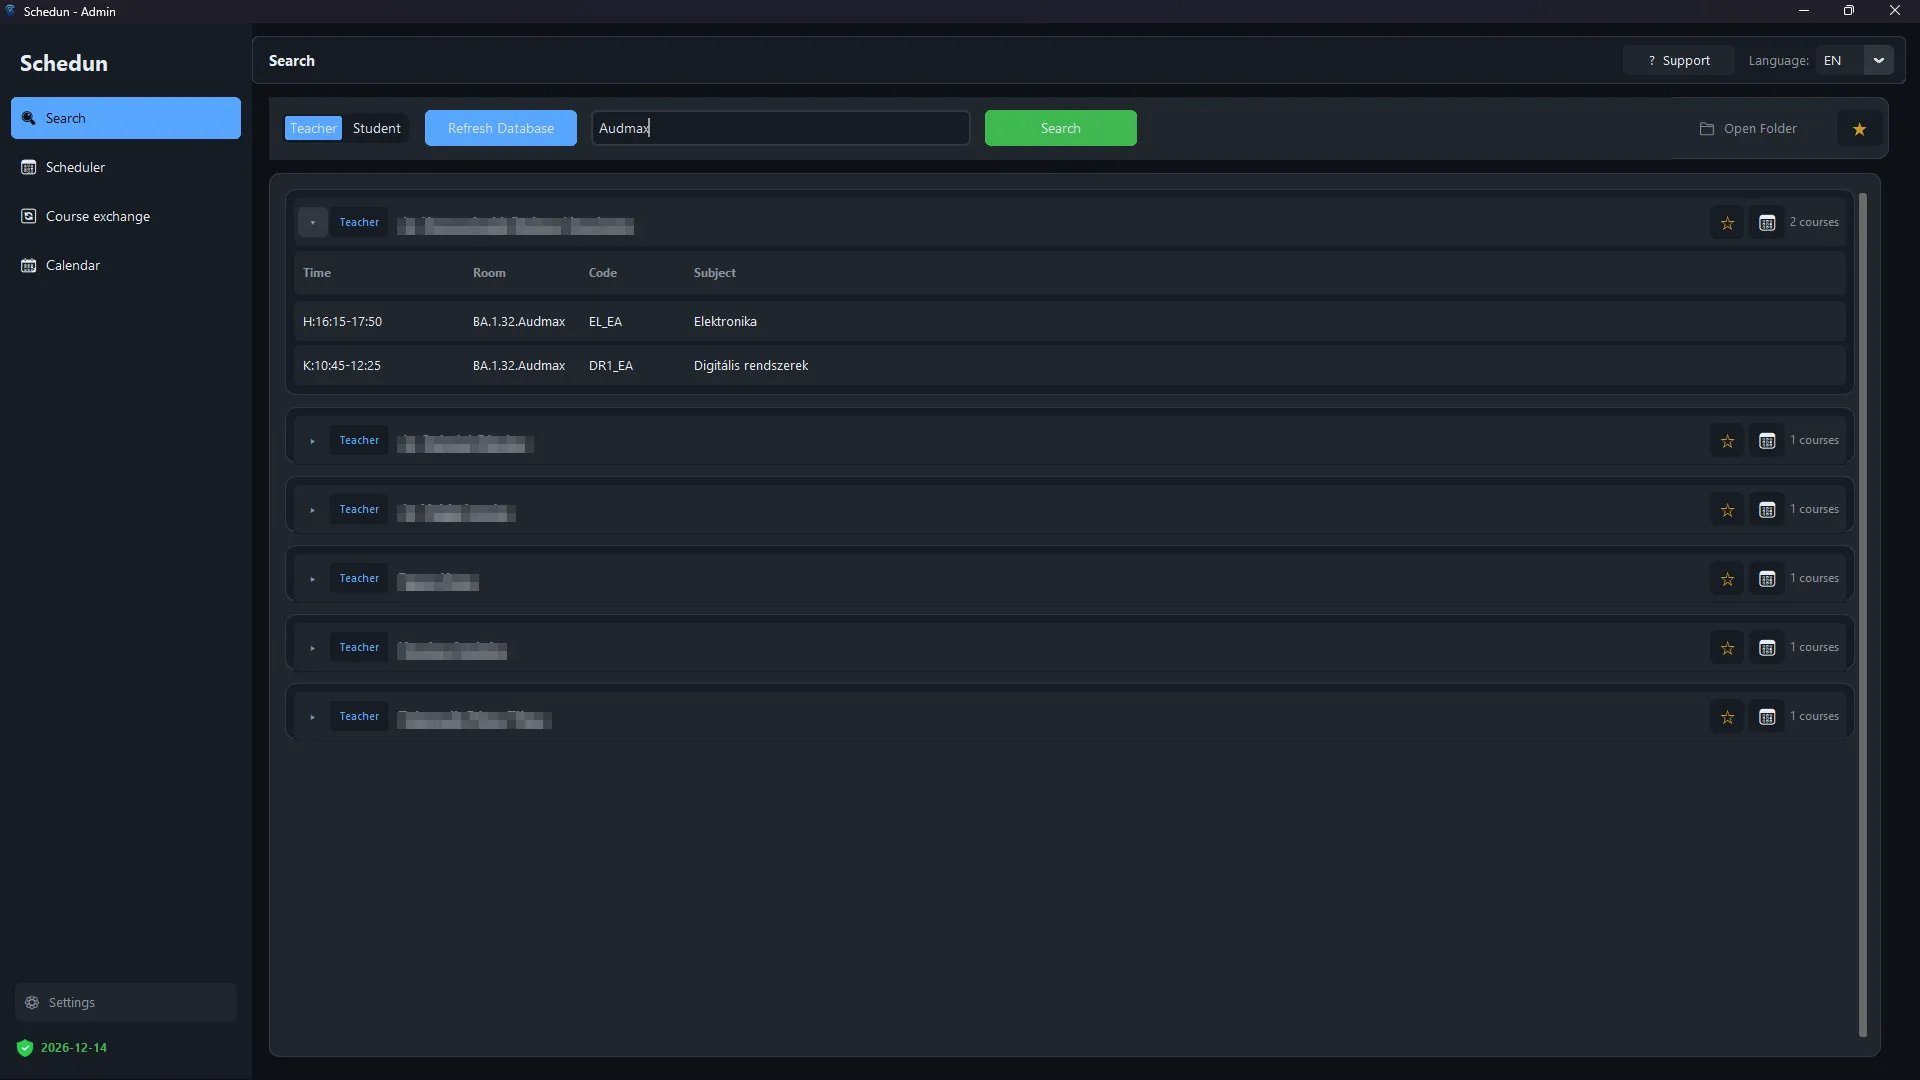
- The sidebar on the left holds the four main tabs: Search, Scheduler,Course exchange and Calendar.
- Settings opens from the bottom-left corner.
- Below it, the shield shows license status and expiry. In demo mode it indicates that no license is active.
- In the header, Support opens this guide and the contact page, while theLanguage dropdown switches between Hungarian and English.
Search: student and teacher schedules
The tab works in two modes: Teacher draws on the course lists added to the search, whileStudent uses the student lists, both from the files of the semester in use. Importing refreshes the database automatically; files copied by hand are read in with Refresh Database— without it, search still reflects the previous state.
The search field accepts a name, a room, a course code or a subject. Results aregrouped by name rather than listed one row per course, and each shows how many courses belong to it. Expanding a result lists those courses by Time, Room,Code and Subject.
Actions on a result
- Star — adds the name to Favorites. The star button at the far right of the header opens theFavorites panel, which can be filtered by All /Teachers / Students.
- Calendar icon — displays that person's schedule in a weekly view.
- ⇄ icon — schedule comparison. It appears on student results only, and requiresMy profile to have been set in Settings. The comparison shows both schedules side by side and lists the time slots where both are free.
Selecting subjects and courses
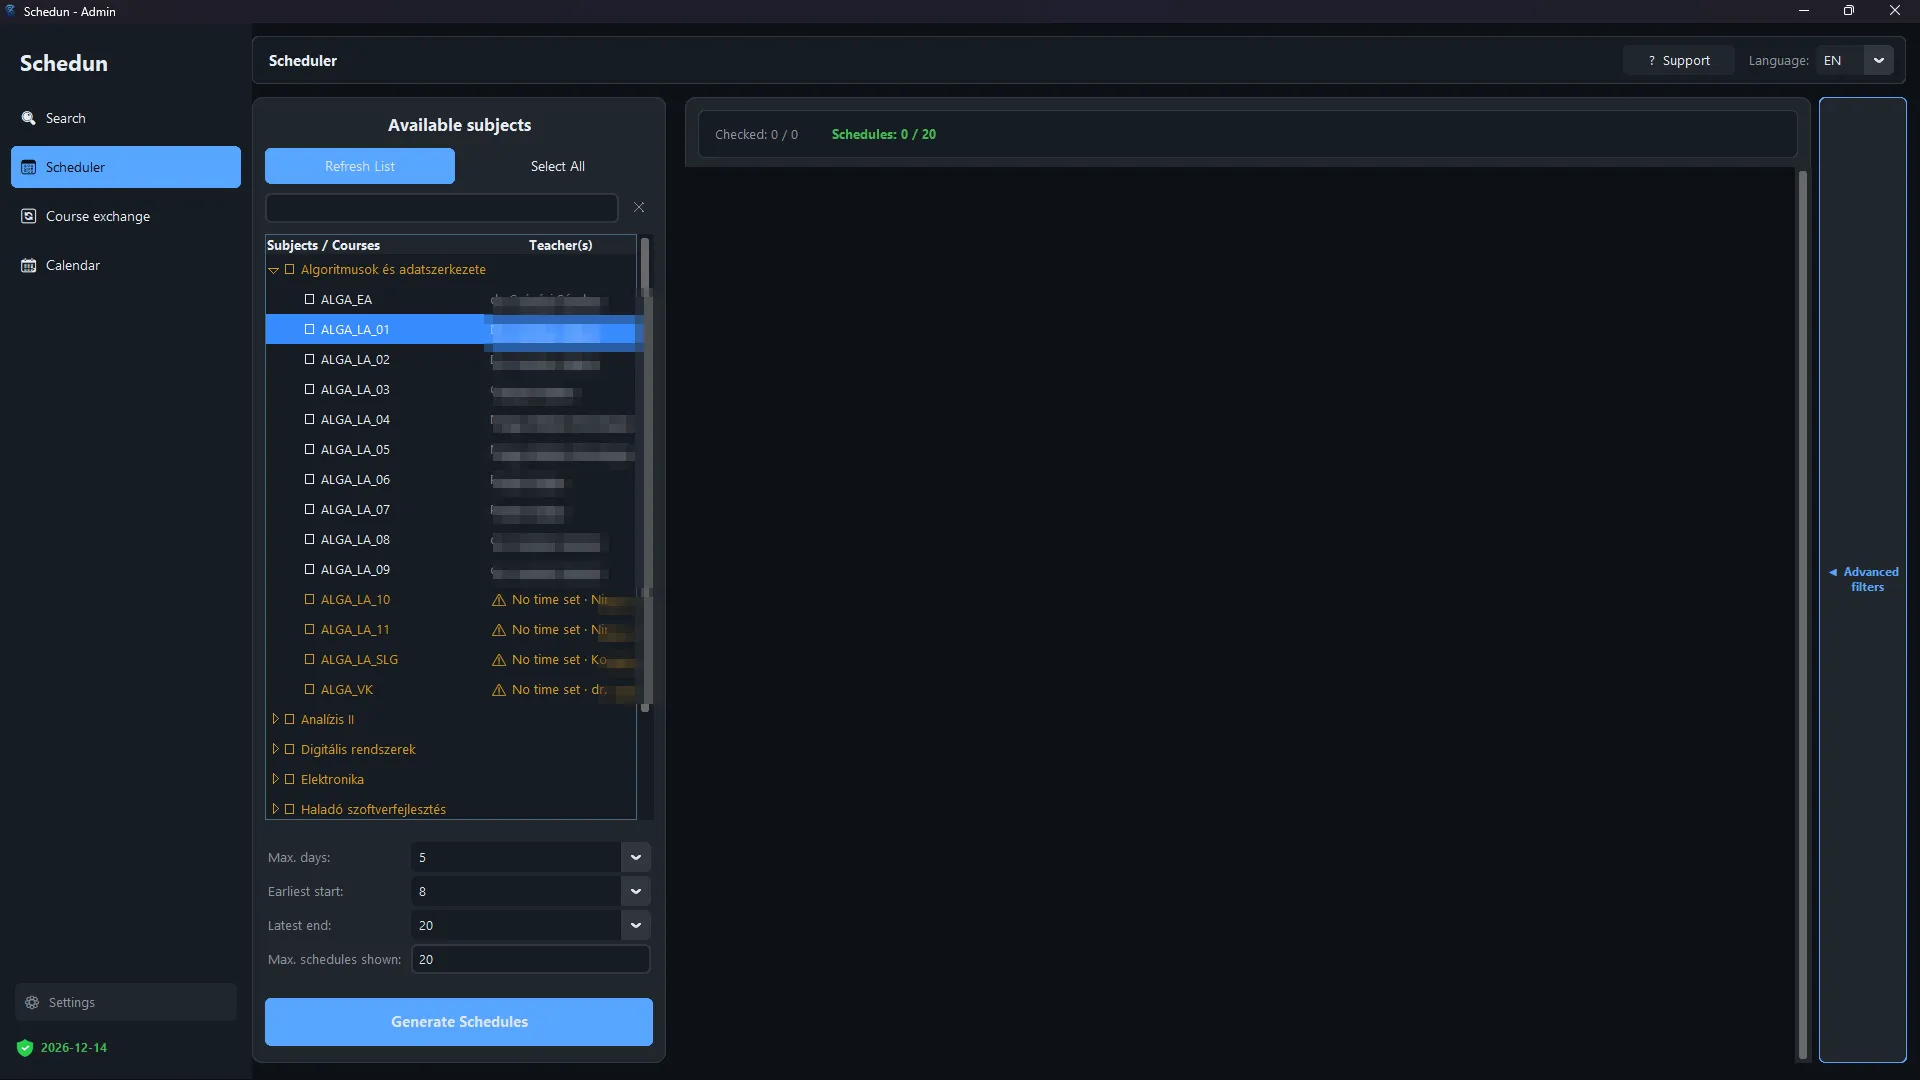
Refresh List re-reads the contents of the semester's Schedule folder, andSelect All ticks every subject in one step. The search field helps with a long list, and the ✕ beside it clears the filter.
Expanding a subject shows its courses and the Teacher(s) column. Narrowing the selection is recommended, as many courses are open only to a specific group of students — exam courses, for instance. Courses without a time are marked “No time set”; these cannot be placed on the grid, so they appear in a separate list above the results. Whether they are included at all is governed in Settings.
Basic filters
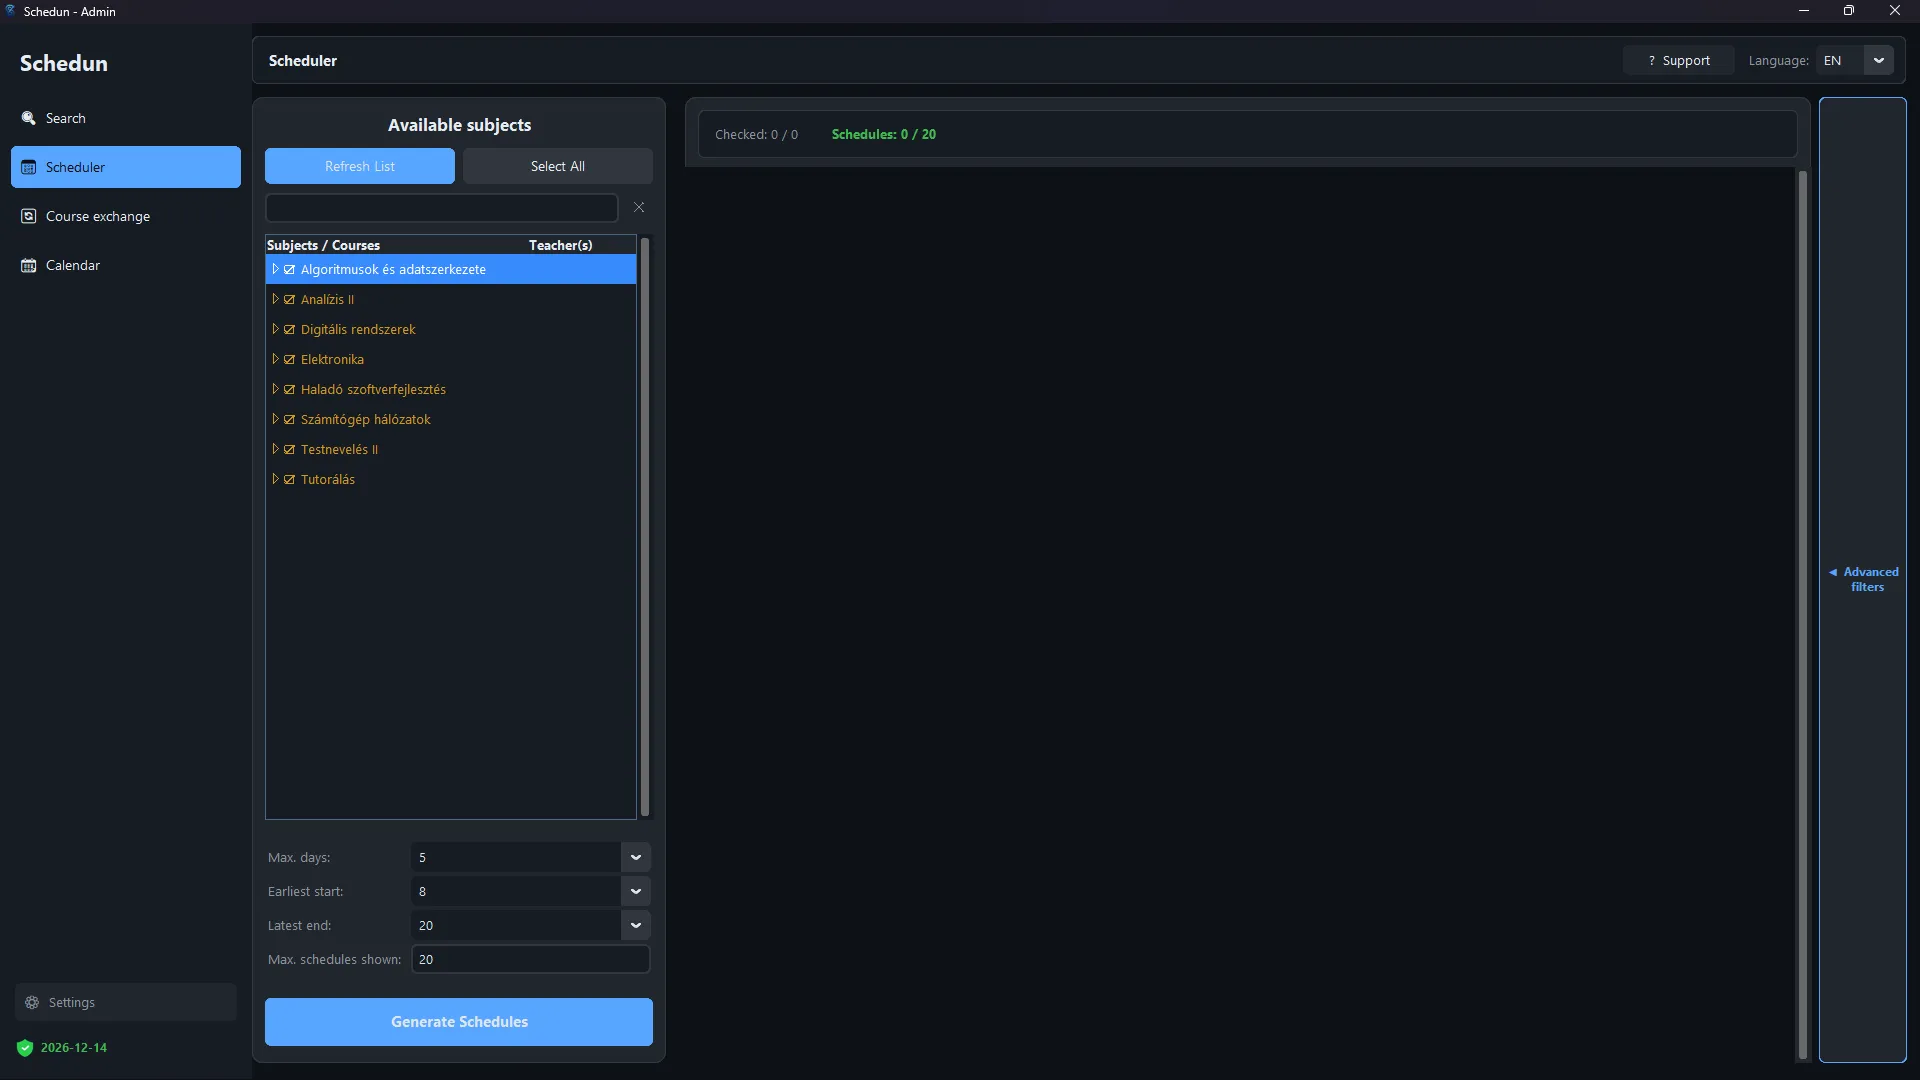
- Max. days — how many days at most should be spent at the university, without skipping a class.
- Earliest start and Latest end — the two ends of the daily window.
- Max. schedules shown — how many results the program should return. Generation stops once that many have been found, unless optimization is switched on.
Generate Schedules starts the search. While it runs, the button turns intoCancel, so a long generation can be stopped at any point. The panel on the right meanwhile shows how many combinations have been checked and how many schedules have been found so far.
Advanced filters
The panel opens from the Advanced filters tab on the right-hand edge.
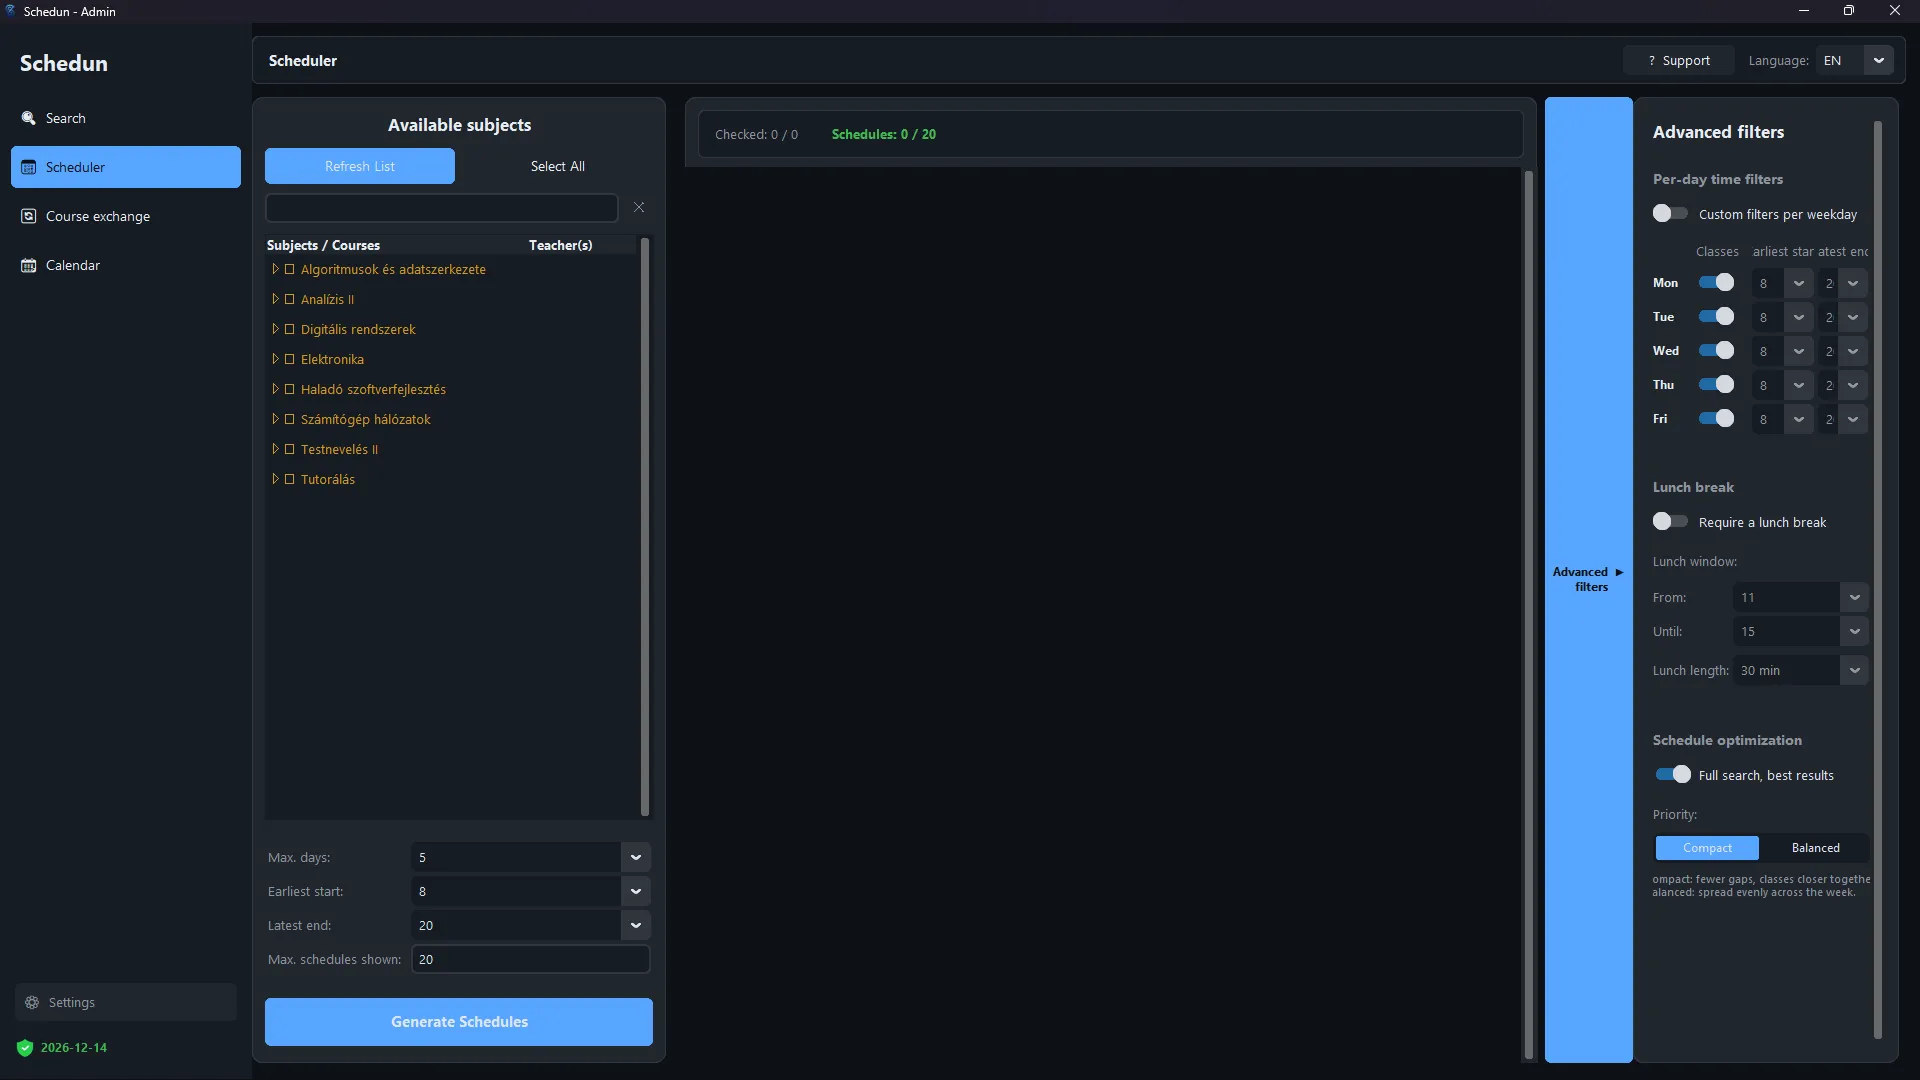
Per-day time filters
Switching on Custom filters per weekday lets each weekday be set separately: whetherClasses should appear that day at all, the earliest it may start, and the latest it may end. This removes the need to force one common time window onto the whole week — a free Friday or a late-starting Monday can be set up just as easily.
Lunch break
With Require a lunch break the program looks for a break between classes each day. Both the Lunch window (From and Until) and the Lunch length — between 15 and 45 minutes — can be set. It is only meaningful on days with more than one class; if the selected courses leave no room for one, the program says so explicitly.
Schedule optimization
Switching on Full search, best results makes the program work through every combination and return the best ones, which is considerably slower. Priority has two values:
- Compact — fewer gaps, classes closer together.
- Balanced — spread evenly across the days of the week.
If the selected courses yield a very large number of combinations, the program asks for confirmation before starting and states that number. Optimization is unavailable in demo mode: there, the first working variation is shown, which is not necessarily the best one.
The results
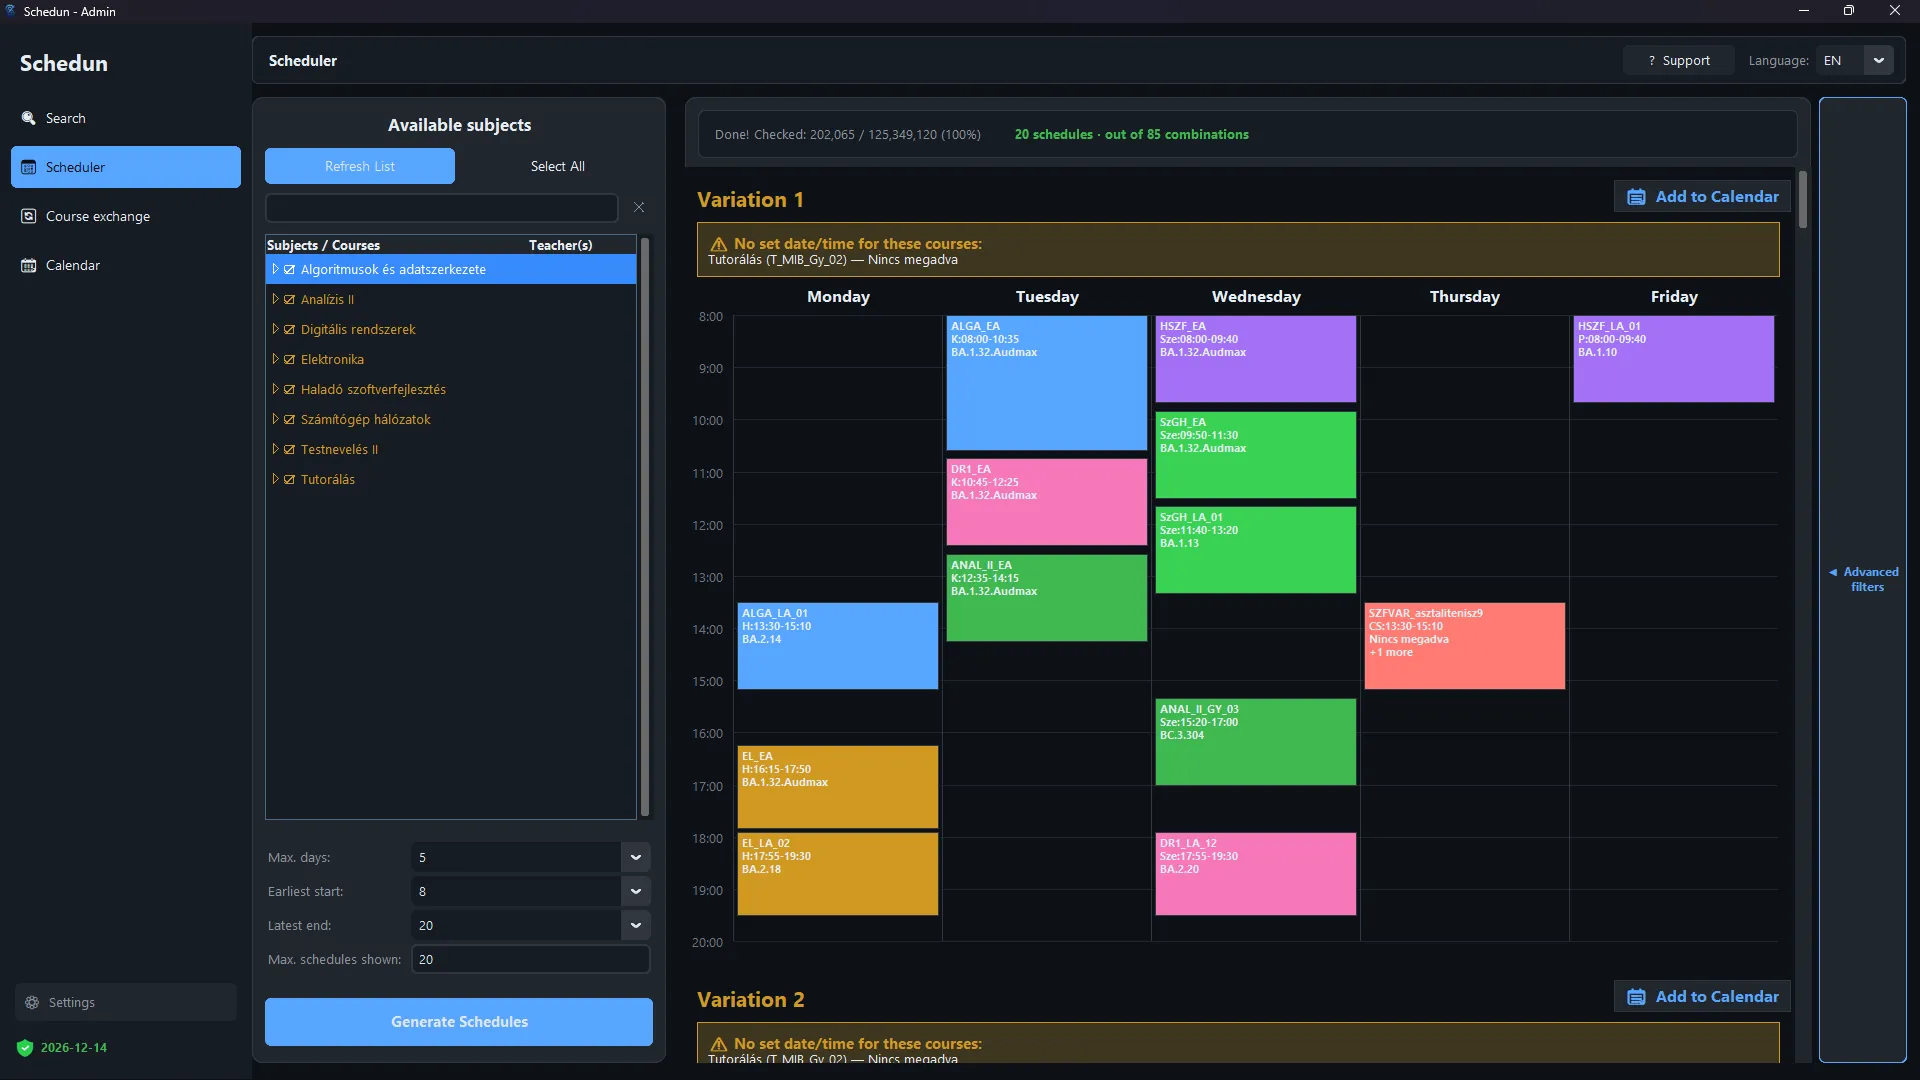
Results appear one variation at a time, drawn onto a weekly grid. Each block carries the course code, its day and time, and the room. Where several courses fall into the same slot, the block is marked“+n more” to show that further entries belong to it; clicking it reveals the course details and the available courses.
If any of the selected courses has no time set, the program lists it above every variation under“No set date/time for these courses”, since it cannot be drawn on the grid.
Every variation carries an Add to Calendar button, which saves that timetable as a schedule plan. Plans saved this way appear on the Calendar tab and can be deleted from there.
Course colours come from the palette chosen in Settings, and a subject always gets the same colour, which makes variations quick to compare.
Calendar and personal events
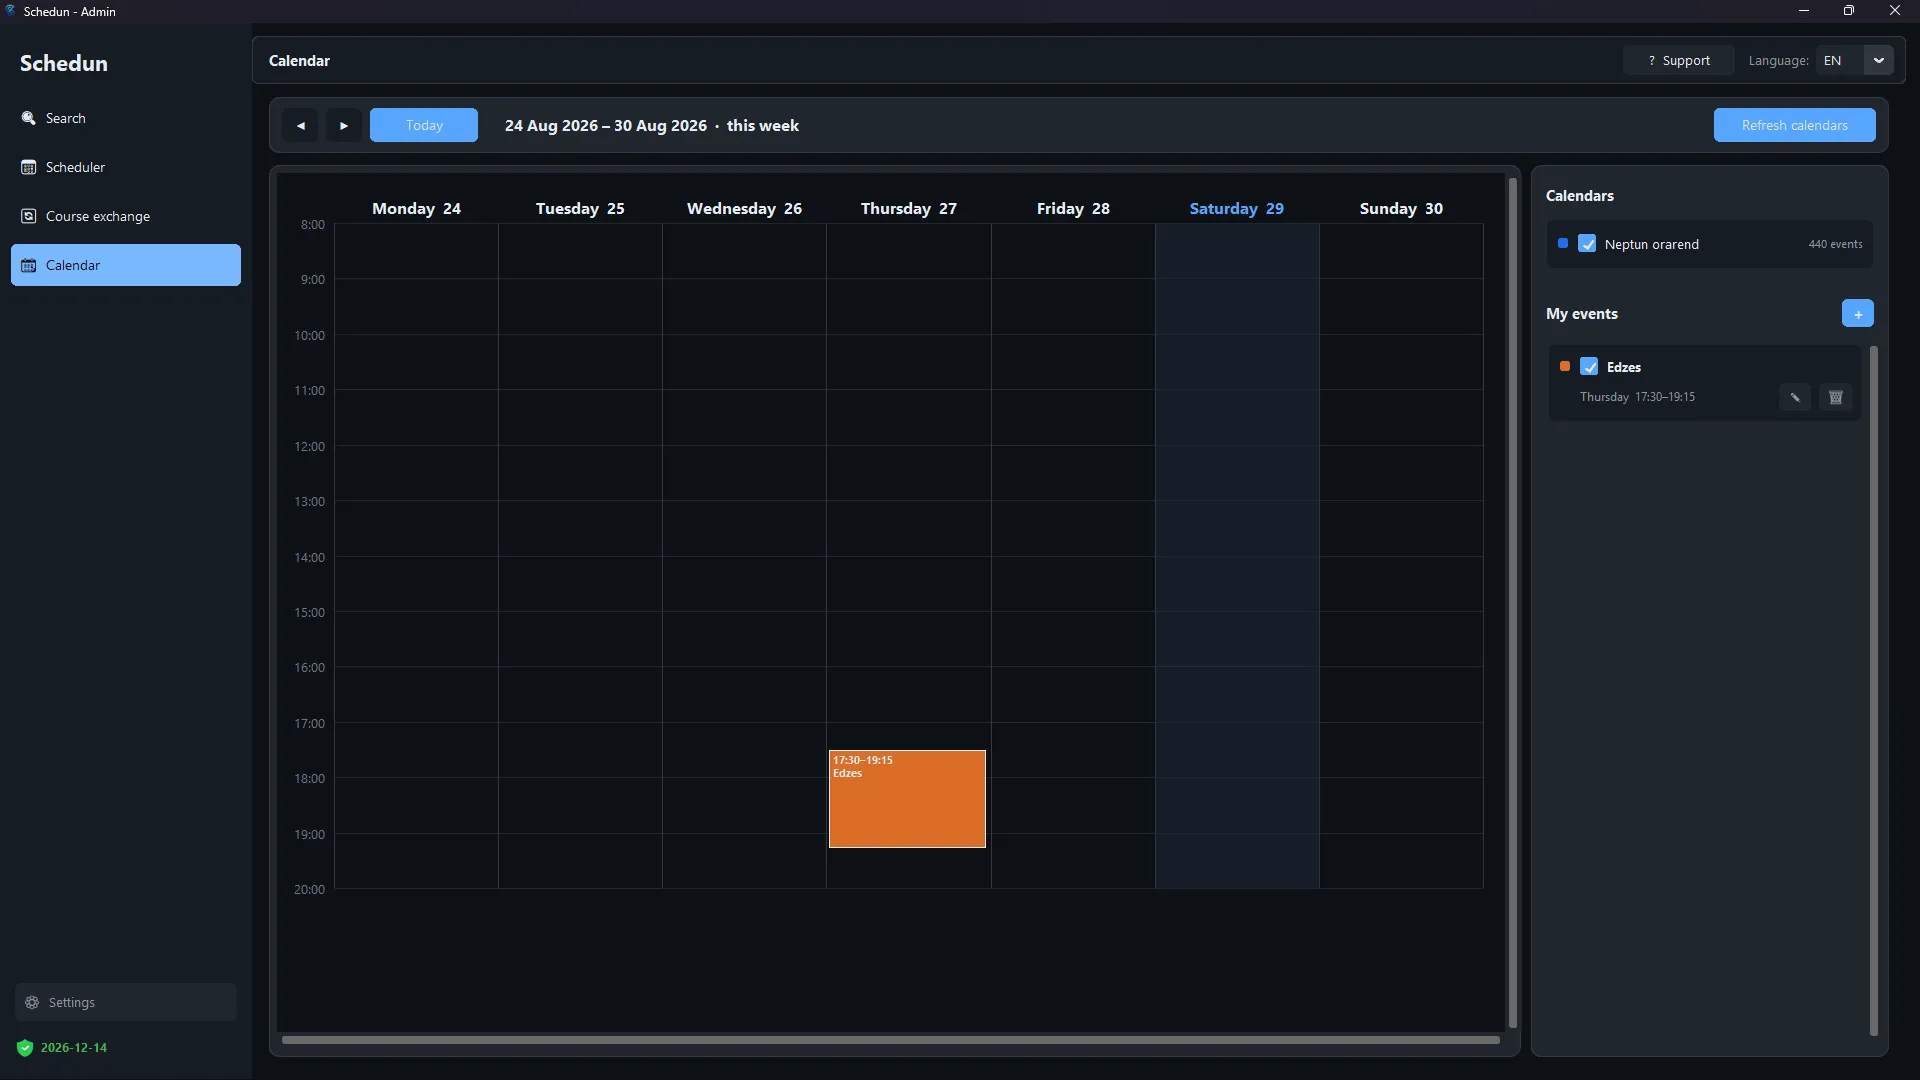
The view always shows one week; the arrows page through them, and Today jumps back to the current week.
The Calendars list on the right holds the Neptun calendars that have been added, together with the number of events loaded from each. Every one can be switched on and off individually, andRefresh calendars downloads their contents again. Calendars are added in Settings.
This is the one feature where the application downloads data straight from Neptun — from the schedule synchronization link the user pastes in. It needs no login either, and the downloaded events stay on the user's machine.
The + button under My events adds a weekly recurring commitment — training or work, for example. Its name, day, start and end time and colour can all be set. Events can be edited and deleted afterwards, and switched off individually. Schedule plans saved from the planner also appear here.
Course exchange market
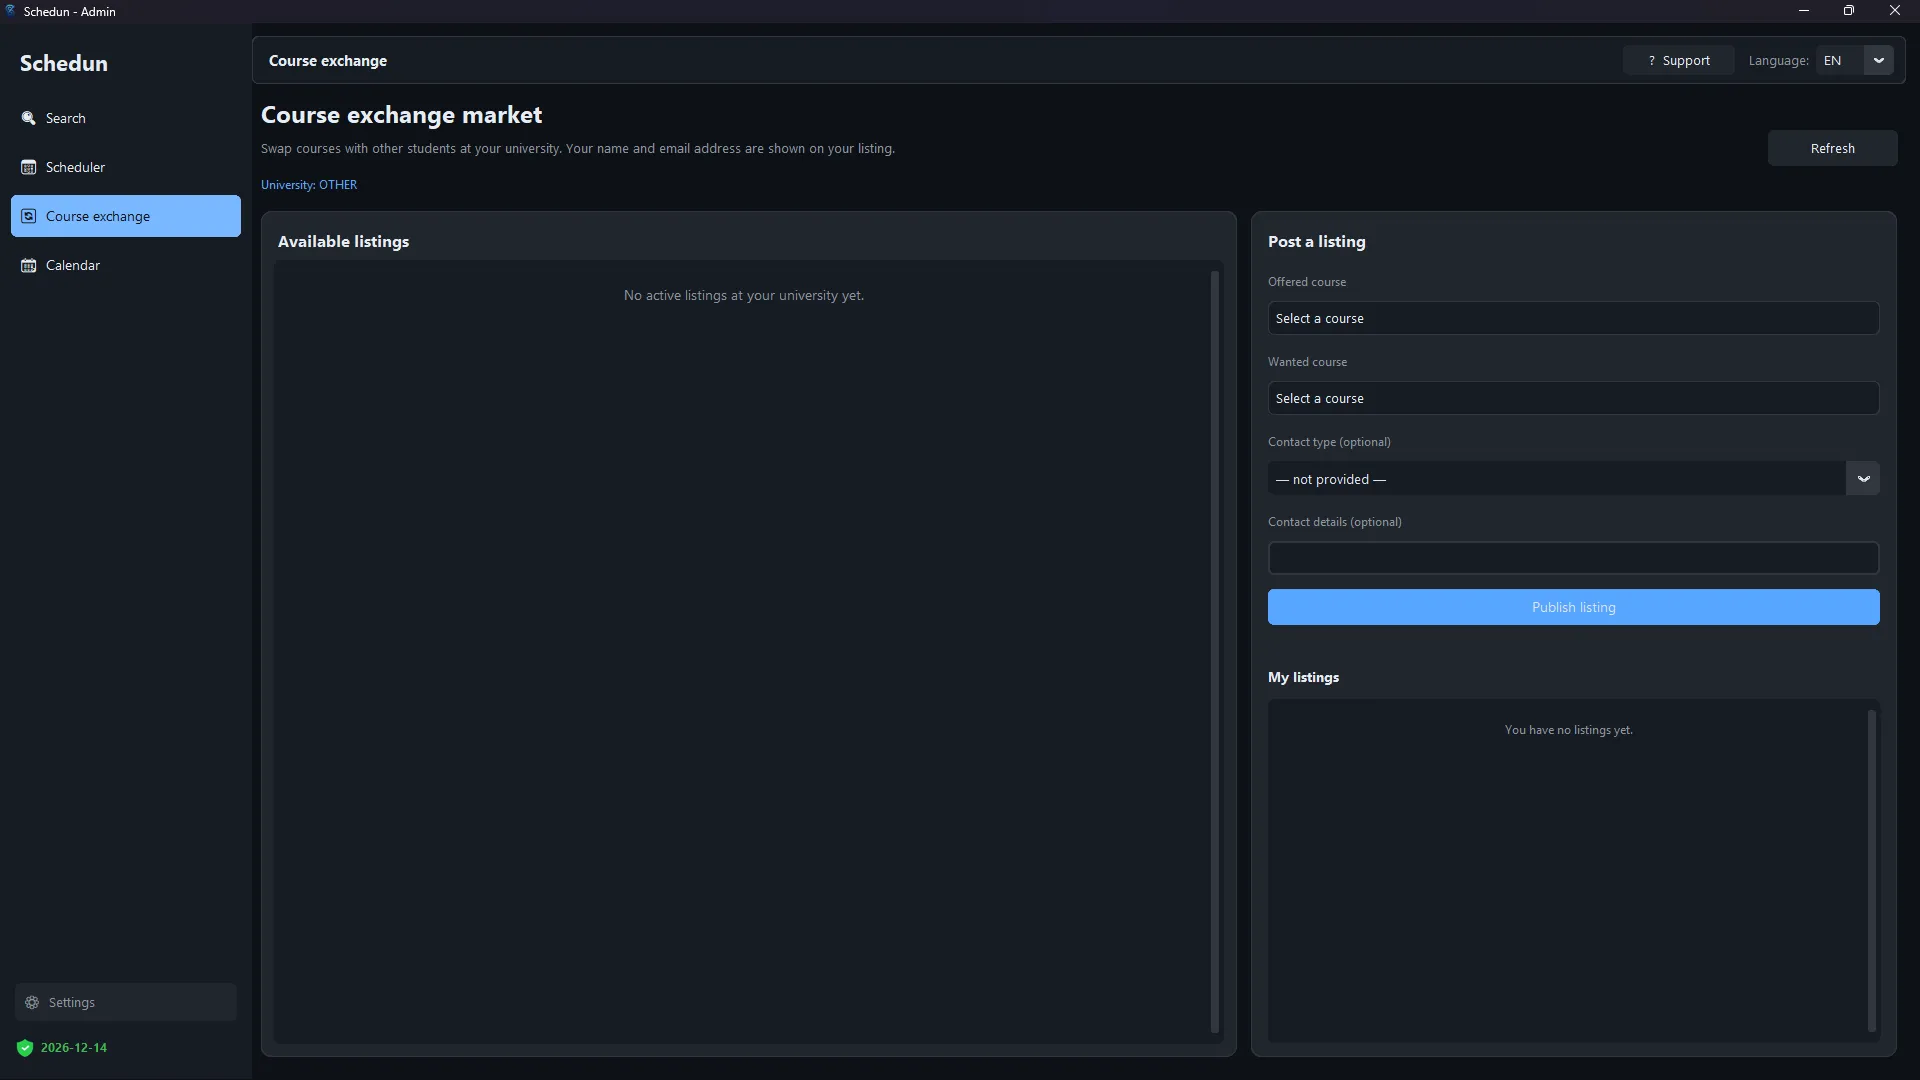
The Post a listing form takes the Offered course and theWanted course. Contact type and Contact details — Discord, Messenger or phone — are optional, but they make arranging the swap easier.Publish listing puts it up.
Available listings shows those from the same university, whileMy listings holds your own, each of which can be withdrawn withDeactivate. A listing shows the poster's name and email address so the other party can get in touch — something the market states explicitly at the top of the tab.
The feature requires a license, and depends on the license having a university assigned to it. Without one, the market is unavailable.
Settings: profile, calendars and colours
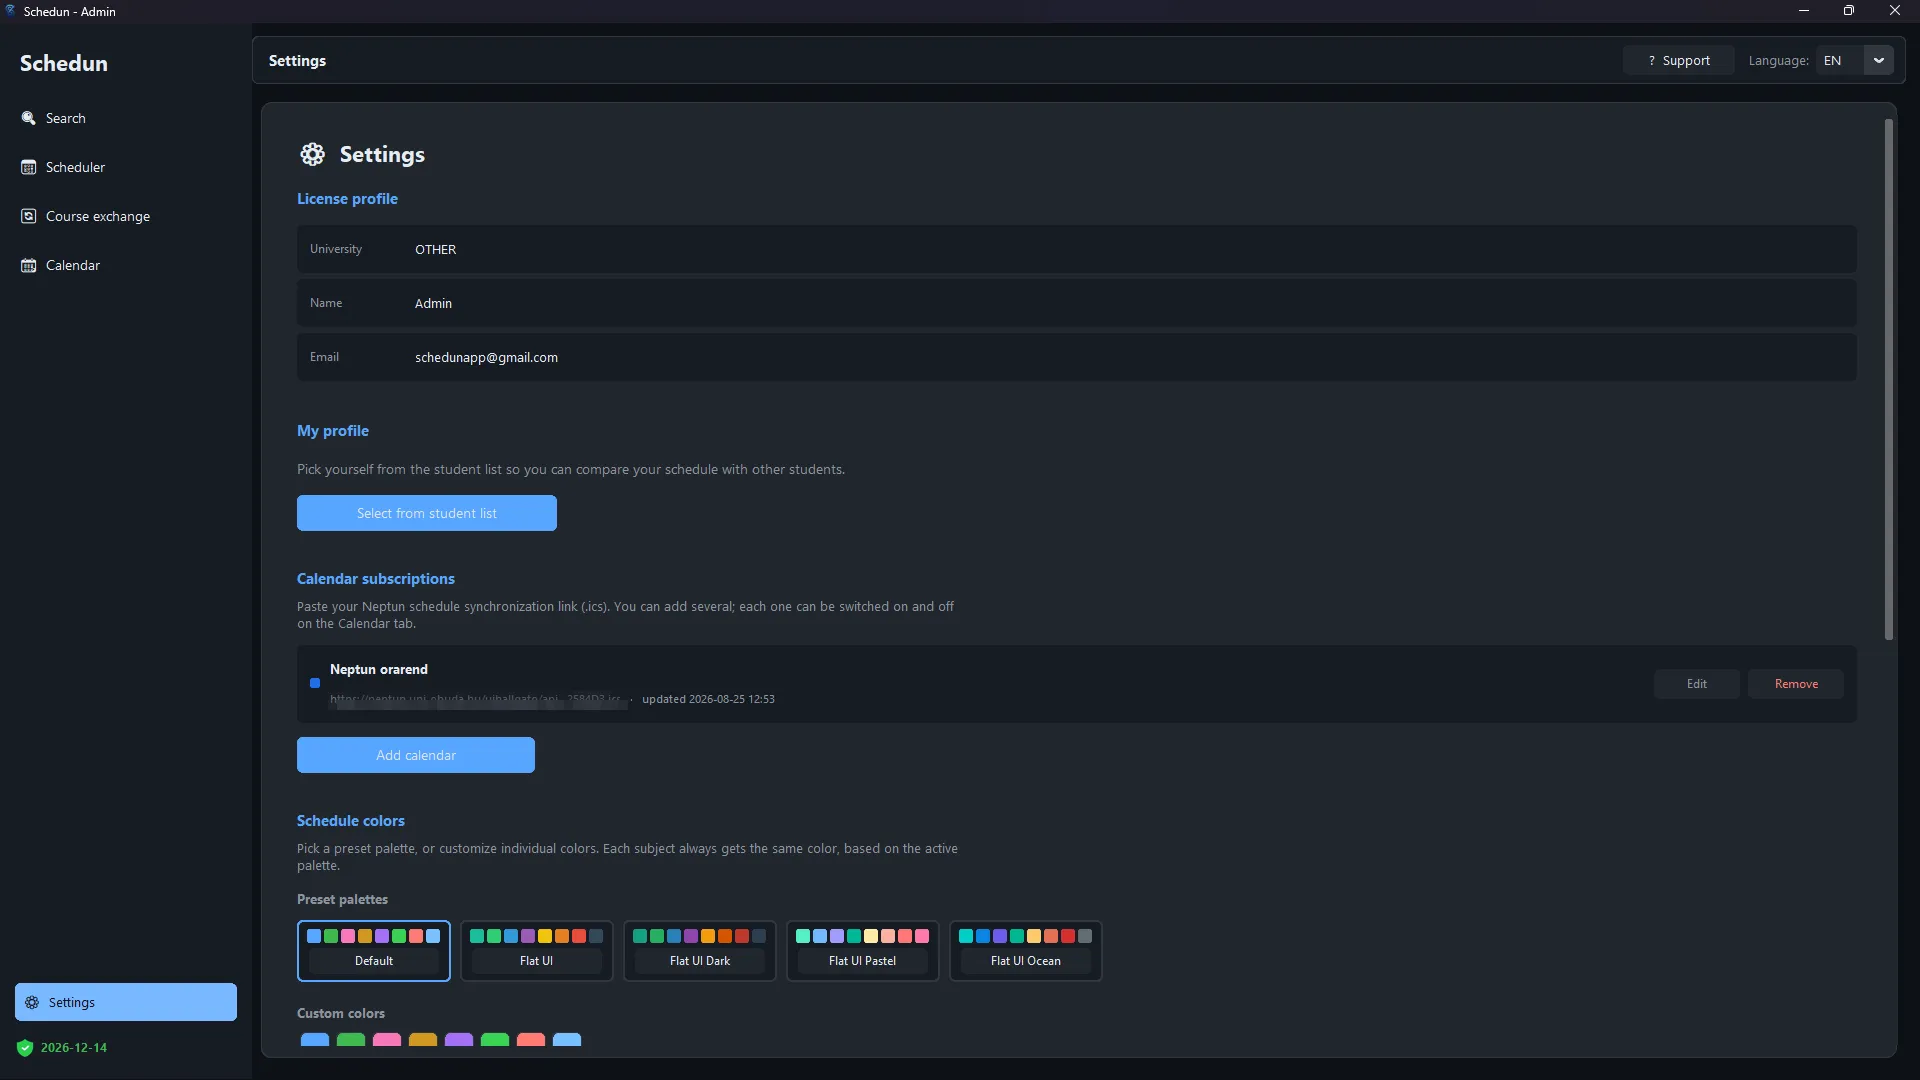
- License profile — the University, Name andEmail attached to the license. These come from the details given at purchase.
- My profile — Select from student list sets which name in the student list belongs to the user. This is what schedule comparison needs, and it requires the student database to have been refreshed.
- Calendar subscriptions — where the Neptun schedule synchronization link is pasted. Several calendars can be added, each managed with Edit and Remove, and the list shows when each was last refreshed.
- Schedule colors — five preset palettes are available, or thecustom colors can be adjusted one by one. A subject always gets the same colour from the active palette, and the palette can be reset to the default at any time.
Courses without a time, and storage
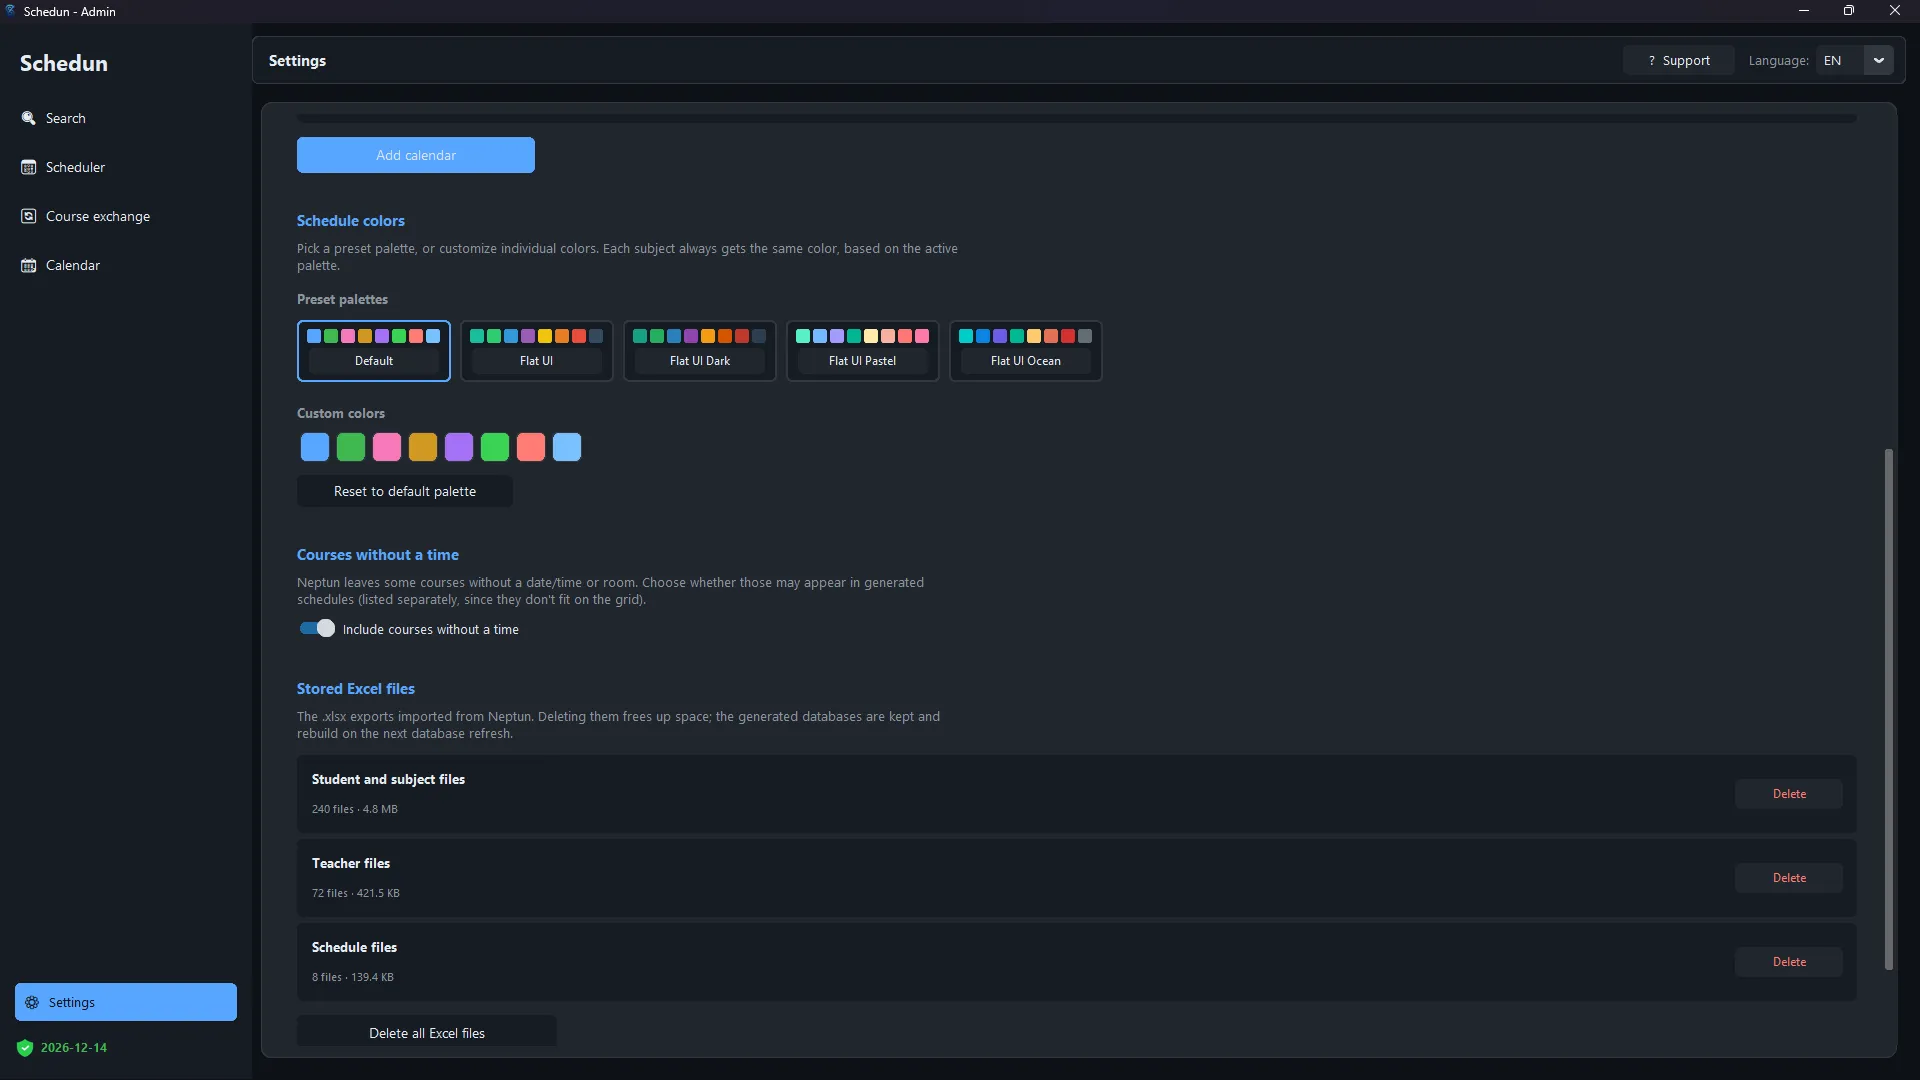
Include courses without a time governs whether courses left without a time or room in Neptun may appear in generated schedules. As they cannot be drawn on the grid, they are listed separately when they do.
The Stored Excel files section shows the files of the semester in use by category —Student and subject files, Schedule files — with their number and size. The categories can be deleted individually or all at once with Delete all Excel files. Deletion affects only the raw Excel files: the database built from them is kept and rebuilds on the next database refresh. An entire semester can be deleted in the Semesters section.
At the bottom of the section, About shows the installed version number.
Demo and license
Demo mode covers basic schedule planning: selecting courses and generating timetables. Optimization, search and the course exchange market require a license, and the application states this at the feature itself.
Activating a license requires an internet connection. If the key is already registered to another machine, has expired, or the license service is temporarily unavailable, the application gives a precise message — and in the case of an outage it leaves the stored key untouched.
The application may occasionally show brief informational messages. These can be hidden for good with the“Don't show again” option.
Further assistance
Common questions are answered on the FAQ page. For anything else, assistance is available at [email protected].